Introduction
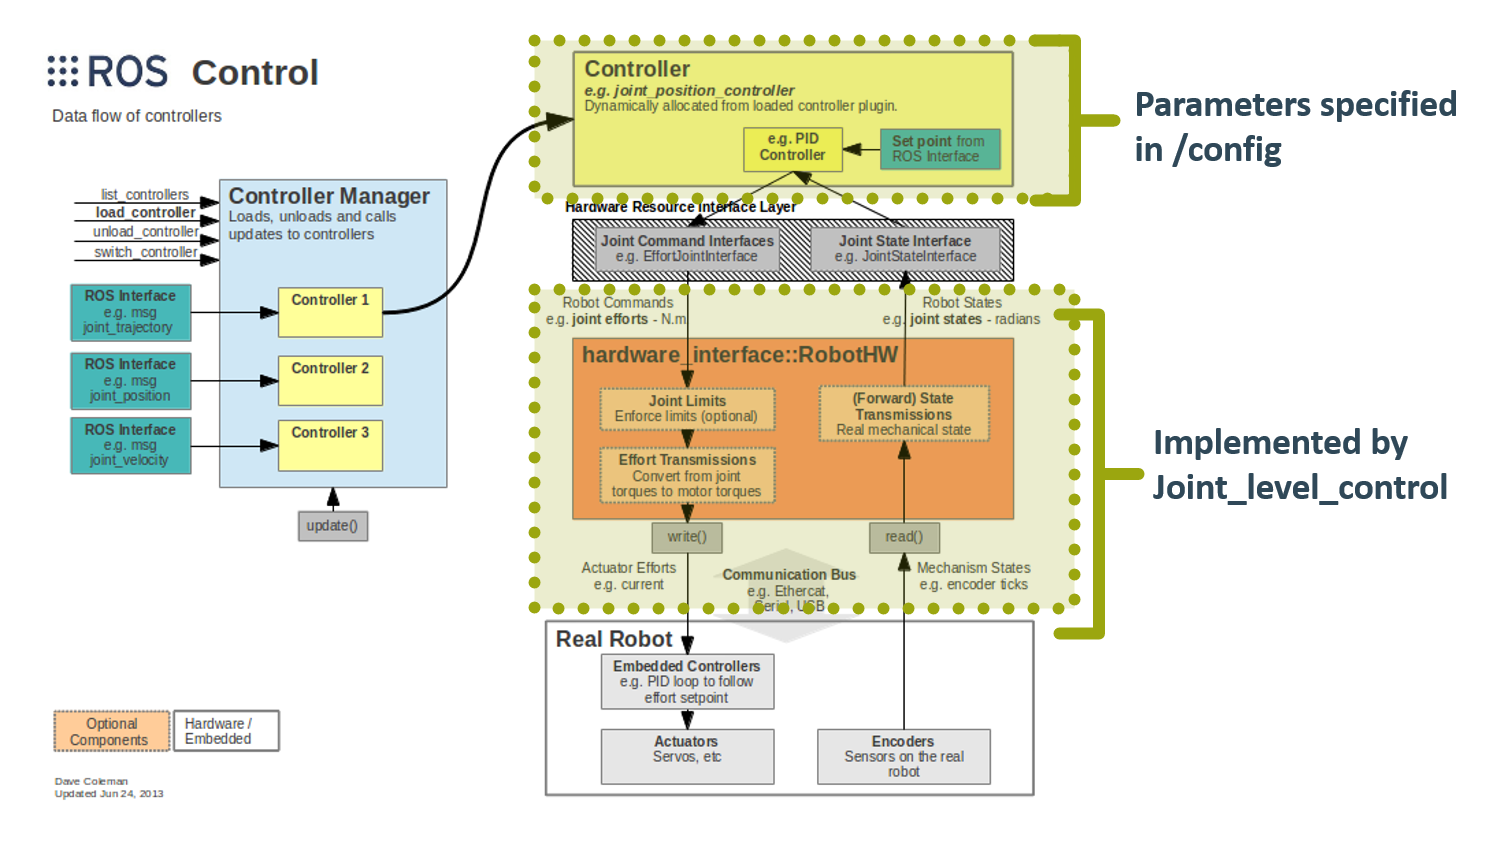
This is the documentation for the TriPed Projects joint level controller. It implements the Hardware Interfaces required by ros_control to interface the joint position and joint space trajectory controllers with the sensors and actuators. A Diagram of how this package interfaces with ros_Control can be seen here:
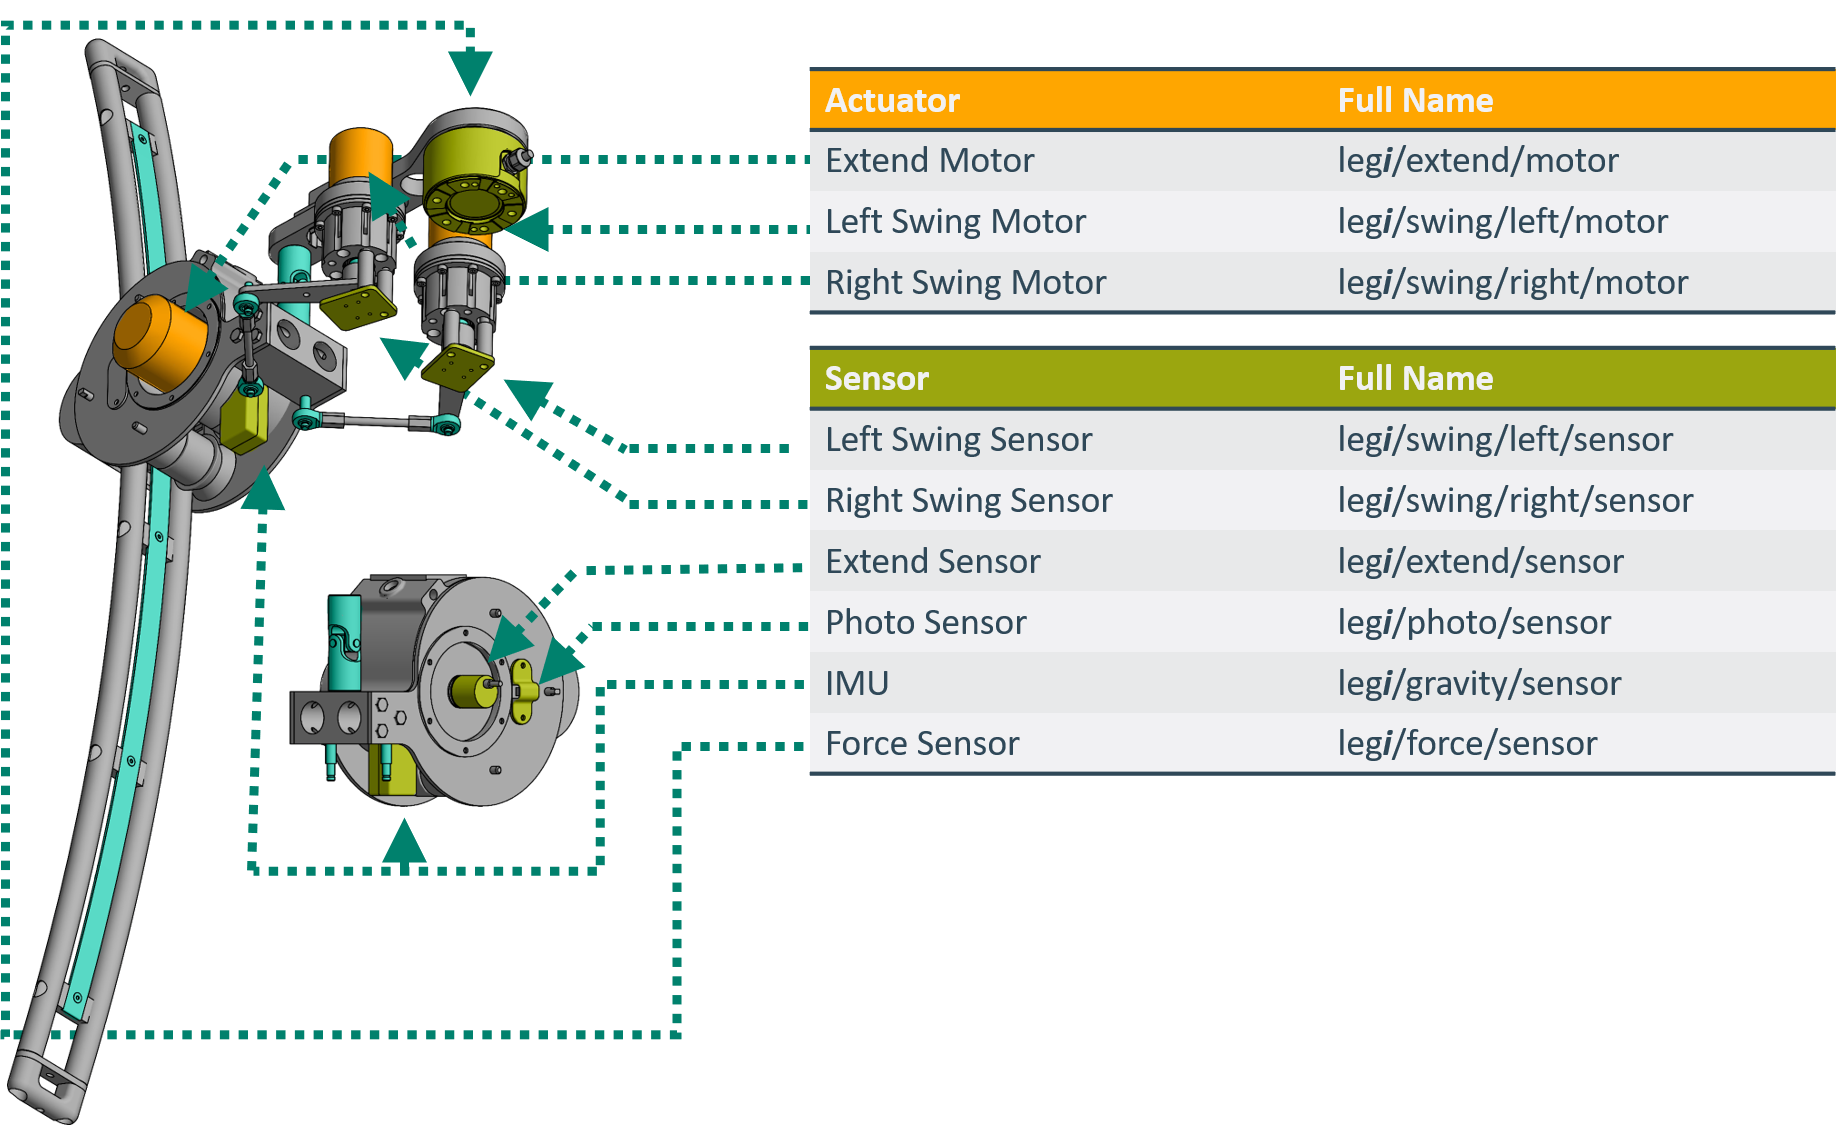
The Naming conventions for each joint, motor, and sensor are specified on the TriPeds main webside and can be seen down below:
Hardware Interface Architecture
Each Leg of the TriPed robot, is made up of two types of joints, extend joints and swing joints each requiring its own hardware interface. Since both types of joints share the same motor controller each hardware interface is designed as a class containing a motor class object and a sensor class object. The rotary_encoder class is the sensor class used by the extend_joint interface, while the hall_sensor class is used by the swing_joint_interface.
Structure of the Project
The Project is designed as ROS package and is distributed into the following directories:
- config
docs
- include
- launch
- src
config
The project is designed to be flexible in regards to different configurations, for this reason, hardware addresses, and other device-specific parameters are always read in from config files. This folder contains all necessary config files for the joint controllers. On startup of the joint controllers, these config files are first set as ROS parameters and then subsequently read out by the approprate ROS nodes.
docs
The docs folder houses the Doxygen documentation from which this page is generated. It is not necessary for the proper functioning of this package.
include
The include directory contains the c++ header files of the package. This special directory is necessary for the catkin_make to find the files. The name of the include directory is specified in the CMakeList file.
launch
The launch directory contains all ROS launch files of the package. It contains the following files
| launch file name | purpose |
|---|---|
| hall_sensor_test | Testing the Hall Sensors |
| motor | Testing the Motor |
| joint_level_control | Start the Joint controllers |
Each launchfile also loads the parameters of the config directory.
src
This directory contains the source code of the package.
Beaglebone Black Setup
In order to use the joint controller the I/O of the Beaglebone black has to be set up. Afterwards the sensors and actuators have to be connected according to the wiring diagram.
This tutorial assumes that one has access to the TriPed image containing a setup catkin_workspace.
Installing Debian
The first step in setting up the Beaglebone is installing a Debian Buster flash image such as the one found here. A tutorial on how to install a flasher image can be found here
SPI Setup <br>
The beaglebone has multiple SPI busses. Currently SPI(1,0) is used. For this bus to work, it is necessary to configure the beaglebone properly.
The SPI Bus 1 shares pins with the hdmi port of the beaglebone. Therefore it is necessary to disable the hdmi port.
- edit '/boot/uEnv.txt'
- uncomment the line
disable_uboot_overlay_video=1 - save &reboot
This disables the hdmi port until the line commented out again.
The Pins of the SPI busses need to be configured, this is done by executing the BBB-SPI_Pin_Setup.sh` file located in the base directory of the sd card.
There should be an output like: Current mode for P9_17 is: spi_cs ...
A more complete tutorial can be found here!
\subsction can_setup CAN Setup The Beaglebone uses a CAN-cape to communicate over CAN. To use this interface the CAN_H und CAN_L wires first have to be connected to the cape. The necessairy commands are collected in the can_setup.sh script located in the base directory of the sd card.
Getting Started
This section details the steps neccesairy to install the joint_level_control package and use it to controll the joints of the TriPed.
Setting up the ROS Environment
To directly use the ROS packages on the SD card its catkin_ws has to automatically be called. This can be done by adding the following line to the .bashrc
$ source /sd/triped_app/catkin_ws/devel/setup.bash
To monitor the Robot from other sysems in the networ additional lines have to be added to configure the network environment:
$ export ROS_IP= IP_OF_SYSTEM
$ export ROS_MASTER_URI= IP_OF_SYSTEM
Installing the Package
Since the project is already inside the SD card image, all all that is lef to do is pull its latest version and make the workspace:
$ roscd joint_level_control
$ git pull
$ roscd
$ catkin_make
$ source devel/setup.sh
To verify that the package was installed one can call
Which should provide informations about the package